Self Hosted Private Email
In this installment of Breaking Up with Big Tech we will demonstrate how to easily configure your own self hosted private email server. By setting up your won self hosted private email server you will have the freedom of virtually unlimited email addresses within your own internet domain. Create email addresses for friends and family, or create email addresses for specific purposes, such as one email address for each online company that you do do business with.
To accomplish our own self hosted private email server we will utilize a Linux virtual server. The main email components are Postix and Dovecot. The server will leverage PostfixAdmin to manage email users, mailboxes and aliases. Finally, Roundcubemail
We will utilize an economical virtual server hosted by our friends at Hetzner. Click here to receive € 20 in credit with Hetzner cloud VPS hosting! (affiliate link)
Installing software
After you have procured your Debian server, open an SSH connection to the system, and type in the following:
$ sudo apt-get install -y apache2 default-mysql-server default-mysql-client dovecot-imapd dovecot-mysql dovecot-pop3d letsencrypt php php-imap postfixadmin postfix-mysql roundcube-mysql Securing Services with LetsEncrypt
In the ancient times of ten years ago, securing services on the internet with encryption was both complex and costly. Today the wonderful people at LetsEncrypt have made the situation so much better by providing legitimate TLS certificates for everyone, and for free at that. TLS certificates and keys are the cryptographic magic necessary to secure our online transactions and traffic.
For this configuration we need three TLS certificates; one for the mail server software, and one the PostfixAdmin server software. The letsencrypt package installed above contains the scripts will create them.
DNS Updates for LetsEncrypt
In order for the commands below to work correctly, letsencrypt requires you to configure DNS records for the certificates that you are going to request. These DNS records should resolve the names of the certificates to the IP address of the server where you will run these commands.
For example, if the server where you will run these commands has the IP address 1.2.3.4 and you want to secure a certificate called mail.yourdomain.com, you would need to create a DNS A record pointing mail.yourdomain.com to IP address 1.2.3.4. Letsencrypt will also work with a CNAME record.
We will create the following domains. In the commands below, replace yourdomain.com with your domain.
- mail.yourdomain.com
- postfixadmin.yourdomain.com
$ sudo letsencrypt certonly --standalone --agree-tos --renew-by-default --email hostmaster@yourdomain.com --domains mail.yourdomain.com
$ sudo letsencrypt certonly --standalone --agree-tos --renew-by-default --email hostmaster@yourdomain.com --domains postfixadmin.yourdomain.com,pfa.yourdomain.com
Now that we have acquired the necessary files, let’s configure the server software to use them.
Server Software: Apache Web Server
Create an Apache VirtualHost configuration for PostfixAdmin in /etc/apache2/sites-available/postfixadmin.yourdomain.com.conf with the following contents
<VirtualHost *:80>
    ServerName postfixadmin.yourdomain.com
    RewriteEngine On
    RewriteRule   ^(.*)$  https://%{HTTP_HOST}$1  [R=301]
</VirtualHost>

<VirtualHost *:443>
    ServerName postfixadmin.yourdomain.com
    ErrorLog ${APACHE_LOG_DIR}/postfixadmin.yourdomain.com-error.log
    CustomLog ${APACHE_LOG_DIR}/postfixadmin.yourdomain.com-access.log combined
    LogLevel warn

    DocumentRoot        /usr/share/postfixadmin/public/

    <Directory /usr/share/postfixadmin/public/>
      Require all granted
      AllowOverride All
    </Directory>

    # HSTS (mod_headers is required) (15768000 seconds = 6 months)
    Header always set Strict-Transport-Security "max-age=15768000"

    SSLCertificateFile /etc/letsencrypt/live/postfixadmin.yourdomain.com/fullchain.pem
    SSLCertificateKeyFile /etc/letsencrypt/live/postfixadmin.yourdomain.com/privkey.pem
    Include /etc/letsencrypt/options-ssl-apache.conf

    <FilesMatch "\.(cgi|shtml|phtml|php)$">
        SSLOptions +StdEnvVars
    </FilesMatch>
    <Directory "/var/www/cgi-bin">
        SSLOptions +StdEnvVars
    </Directory>

    Alias /icons /usr/share/httpd/icons
    <Directory /usr/share/httpd/icons>
      Require all granted
    </Directory>

    Alias /error /usr/share/httpd/error
    <Directory /usr/share/httpd/error>
      Require all granted
    </Directory>

    #CustomLog logs/ssl_request_log "%t %h %{SSL_PROTOCOL}x %{SSL_CIPHER}x \"%r\" %b"
</VirtualHost>
Now enable the configuration by executing
$ sudo a2ensite postfixadmin.yourdomain.comThis will enable the Apache VirtualHost configuration by creating a symbolic link between /etc/apache2/sites-available/postfixadmin.yourdomain.com.conf and /etc/apache2/sites-enabled/postfixadmin.yourdomain.com.conf, where the Apache webserver software will read the configuration on startup.
Enable mod_headers so that PostfixAdmin works correctly.
$ sudo a2enmod headersNow restart apache now to load the new configuration.
$ sudo systemctl restart apache2PostfixAdmin Manual Setup
In order to be of use, the PostfixAdmin software requires you to take a few manual steps.
The first step that is required is to create the PostfixAdmin cache directory, and allow Apache to write into it. Execute these commands on your server
$ sudo mkdir /usr/share/postfixadmin/templates_c/
$ sudo chown www-data /usr/share/postfixadmin/templates_c/
Now open a browser window and go to https://postfixadmin.yourdomain.com/setup.php. You should be greeted with the PostfixAdmin setup screen
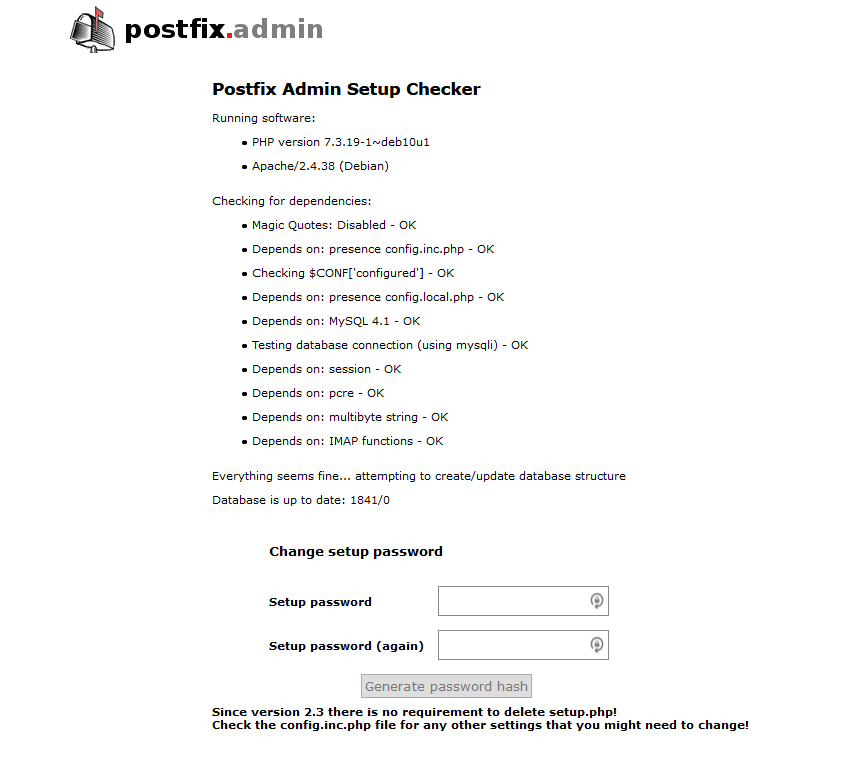
Select a setup password. This is not the same as your login password. The setup password is only used on this screen, and can be thought of as the super-super-admin PostfixAdmin password.
After you have selected the password and typed it into both boxes, click the ‘Generate password hash’ button to be taken to a screen like this
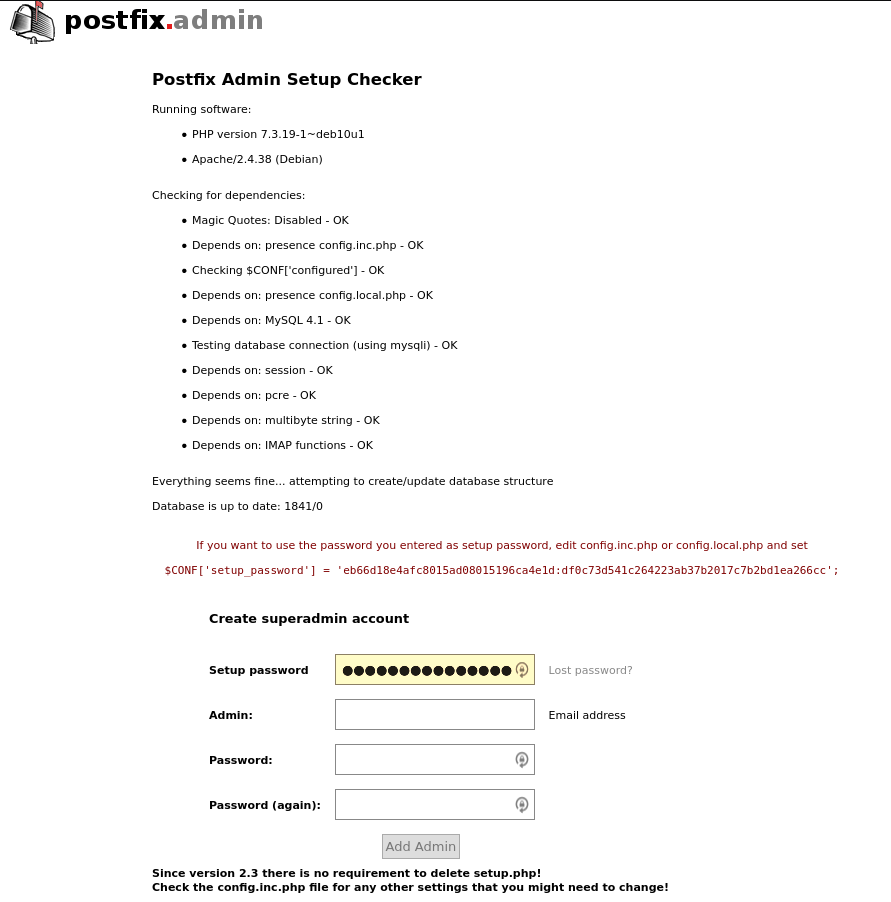
Here is the manual configuration bit.
Copy the line of text with $CONF[‘setup_password’] = ‘eb66d1…’; to your clipboard. This needs to be added to the bottom of the file /etc/postfixadmin/config.local.php
After $CONF[‘setup_password’] has been set in /etc/postfixadmin/config.local.php, go back to the browser window and create an admin account. This admin account will be used to configure the rest of the email system, including creating other email administrators. Create this account now using your own email address. Don’t forget to set a strong password (coming soon).
PostfixAdmin: Your email domain
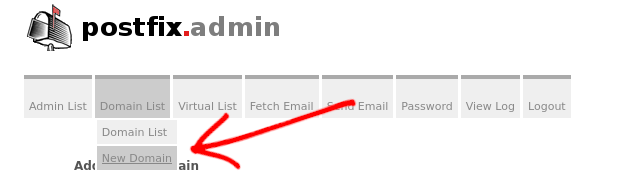
The first thing to do after logging in to https://postfixadmin.yourdomain.com is to configure your email domain in PostfixAdmin. To do this, click on the ‘Domain List’ in the menu at the top of the screen, and then click ‘New Domain’
Fill out the form with the details for your domain.
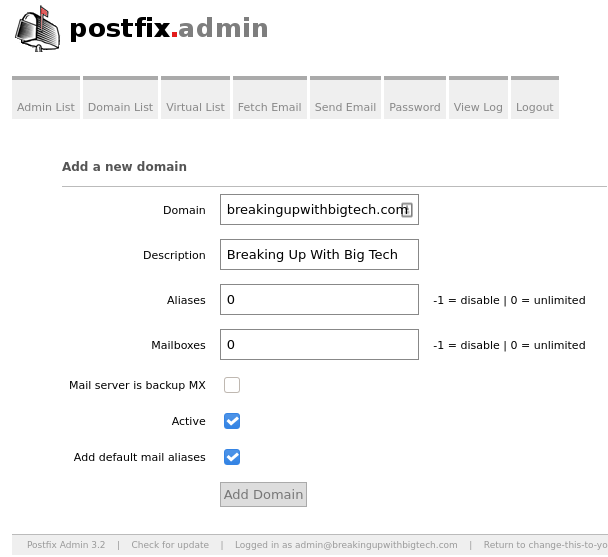
Aliases and Mailboxes are set to 10 by default. If you can anticipate how many email addresses and aliases you are going to need, set these appropriately. If you can not anticipate these needs, consider disabling them by setting the values to zero.
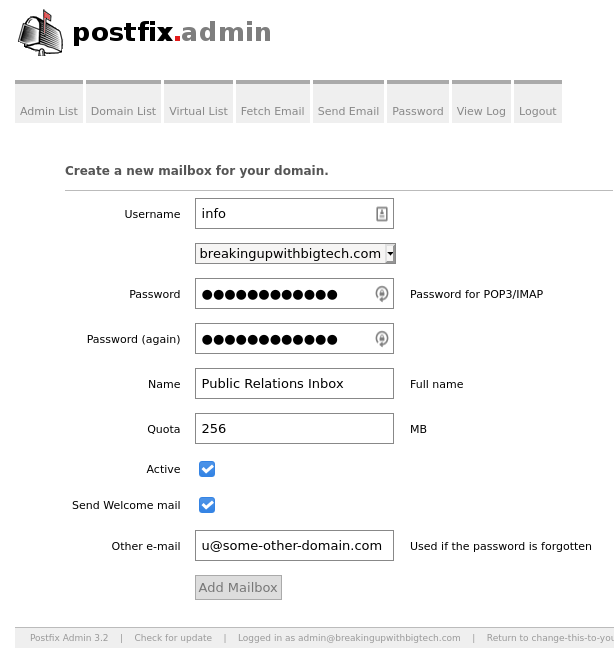
PostfixAdmin: Creating the first mailbox
After configuring a domain it is time to configure an email mailbox. Your system must have at least one mailbox in order to receive email from the larger internet.
To create a mailbox, simply click on the top menu. ‘Virtual List’ -> ‘Add Mailbox’
Postfix: Configuring MySQL lookups
In order for Postfix to read the database that PostfixAdmin manages we must make some changes to the postfix configuration.
$ sudo postconf -e "smtpd_tls_cert_file=/etc/letsencrypt/live/mail.yourdomain.com/fullchain.pem"
$ sudo postconf -e "smtpd_tls_key_file=/etc/letsencrypt/live/mail.yourdomain.com/privkey.pem"
$ sudo postconf -e "virtual_mailbox_domains = proxy:mysql:/etc/postfix/sql/mysql_virtual_domains_maps.cf"
$ sudo postconf -e "virtual_alias_maps=proxy:mysql:/etc/postfix/sql/mysql_virtual_alias_maps.cf,proxy:mysql:/etc/postfix/sql/mysql_virtual_alias_domain_maps.cf,proxy:mysql:/etc/postfix/sql/mysql_virtual_alias_domain_catchall_maps.cf"
$ sudo postconf -e "virtual_mailbox_maps=proxy:mysql:/etc/postfix/sql/mysql_virtual_mailbox_maps.cf,proxy:mysql:/etc/postfix/sql/mysql_virtual_alias_domain_mailbox_maps.cf"
$ sudo postconf -e "relay_domains=proxy:mysql:/etc/postfix/sql/mysql_relay_domains.cf"
$ sudo postconf -e "transport_maps=proxy:mysql:/etc/postfix/sql/mysql_transport_maps.cf"
Now create each of the files referenced above.
# mysql_relay_domains.cf
user = postfix
password = REPLACE_WITH_YOUR_DATABASE_PASSWORD
hosts = localhost
dbname = postfix
query = SELECT domain FROM domain WHERE domain='%s' AND active = '1' AND (transport
 LIKE 'smtp%%' OR transport LIKE 'relay%%')
# mysql_transport_maps.cf
user = postfix
password = REPLACE_WITH_YOUR_DATABASE_PASSWORD
hosts = localhost
dbname = postfix
query = SELECT transport FROM domain WHERE domain='%s' AND active = '1'# mysql_virtual_alias_domain_catchall_maps.cf
user = postfix
password = REPLACE_WITH_YOUR_DATABASE_PASSWORD
hosts = localhost
dbname = postfix
query = SELECT goto FROM alias,alias_domain WHERE alias_domain.alias_domain = '%d' and alias.address = CONCAT('@', alias_domain.target_domain) AND alias.active='1' AND alias_domain.active='1'# mysql_virtual_alias_domain_mailbox_maps.cf
user = postfix
password = REPLACE_WITH_YOUR_DATABASE_PASSWORD
hosts = localhost
dbname = postfix
query = SELECT maildir FROM mailbox,alias_domain WHERE alias_domain.alias_domain = '%d' and mailbox.username = CONCAT('%u', '@', alias_domain.target_domain) AND mailbox.active='1' AND alias_domain.active='1'# mysql_virtual_alias_domain_maps.cf
user = postfix
password = REPLACE_WITH_YOUR_DATABASE_PASSWORD
hosts = localhost
dbname = postfix
query = SELECT goto FROM alias,alias_domain WHERE alias_domain.alias_domain = '%d' and alias.address = CONCAT('%u', '@', alias_domain.target_domain) AND alias.active='1' AND alias_domain.active='1'# mysql_virtual_alias_maps.cf
user = postfix
password = REPLACE_WITH_YOUR_DATABASE_PASSWORD
hosts = localhost
dbname = postfix
query = SELECT goto FROM alias WHERE address='%s' AND active = '1'# mysql_virtual_domains_maps.cf
user = postfix
password = REPLACE_WITH_YOUR_DATABASE_PASSWORD
hosts = localhost
dbname = postfix
query = SELECT domain FROM domain WHERE domain='%s' AND active = '1'# mysql_virtual_mailbox_limit_maps.cf
user = postfix
password = REPLACE_WITH_YOUR_DATABASE_PASSWORD
hosts = localhost
dbname = postfix
query = SELECT quota FROM mailbox WHERE username='%s' AND active = '1'# mysql_virtual_mailbox_maps.cf
user = postfix
password = REPLACE_WITH_YOUR_DATABASE_PASSWORD
hosts = localhost
dbname = postfix
query = SELECT maildir FROM mailbox WHERE username='%s' AND active = '1'Postfix: Test MySQL Lookups
After completing the section above and with all of the files above in place, restart postfix via systemctl, then test that the lookups work as expected.
$ sudo systemctl restart postfix

# This should return "yourdomain.com"
$ sudo postmap -q yourdomain.com "mysql:/etc/postfix/sql/mysql_virtual_domains_maps.cf"

# This should return "yourdomain.com/info/"
$ sudo postmap -q info@yourdomain.com "mysql:/etc/postfix/sql/mysql_virtual_mailbox_maps.cf"
If these commands fail, confirm your database settings in the postfix SQL files. On a Debian system this information is stored in /etc/postfixadmin/dbconfig.inc.php
Operating System: Virtual email user and group
Now we need to ensure that all of the components of the email system work together. We do this by creating a shared user so that postfix and dovecot can both manage email on the system.
$ sudo groupadd -g 5000 vmail
$ sudo useradd -d /var/mail/vdomains -u 5000 -g 5000 -m vmail
$ sudo usermod -G vmail postfix
$ sudo usermod -G vmail dovecot
Postfix: Configuration for virtual email users
At this point Postfix is configured to utilize the MySQL database, and is able to read the database to lookup email addresses and mailboxes. Now we need to make Postfix use the vmail user and group for virtual UID and GID maps.
$ sudo postconf -e "virtual_mailbox_base=/var/mail/vdomains"
$ sudo postconf -e "virtual_minimum_uid=100"
$ sudo postconf -e "virtual_gid_maps=static:5000"
$ sudo postconf -e "virtual_uid_maps=static:5000"
Postfix should be able to receive email from the outside world and route it to mailboxes on the server.
To enable SASL authentication for sending email, add the following postfix configuration
$ sudo postconf -e "smtpd_sasl_auth_enable=yes"
$ sudo postconf -e "smtpd_sasl_type=dovecot"
$ sudo postconf -e "smtpd_sasl_path=private/auth"
Dovecot: Configuration for email retreival
Now that Postfix can receive our email and place it into a mailbox we need to connect to the mail server to read our email. The software that makes this possible is called Dovecot.
To configure Dovecot edit /etc/dovecot/local.conf and insert the following:
# /etc/dovecot/local.conf
protocols = imap pop3

service imap-login {
  inet_listener imap {
    address=127.0.0.1
    port=143
  }
}
service pop3-login {
  inet_listener pop3 {
    port=0
  }
}

auth_mechanisms = plain login
disable_plaintext_auth = no
log_path = /var/log/dovecot

mail_location = maildir:/var/mail/vdomains/%d/%n

userdb {
  driver = sql
  args = /etc/dovecot/dovecot-sql.conf.ext
}
passdb {
  driver = sql
  args = /etc/dovecot/dovecot-sql.conf.ext
}
service auth {
  unix_listener /var/spool/postfix/private/auth {
    group = vmail
    mode = 0660
    user = vmail
  }
  unix_listener auth-master {
    group = vmail
    mode = 0600
    user = vmail
  }
}
ssl_cert = </etc/letsencrypt/live/mail.YOURDOMAIN.COM/fullchain.pem
ssl_key = </etc/letsencrypt/live/mail.YOURDOMAIN.COM/privkey.pem

protocol lda {
  auth_socket_path = /var/run/dovecot/auth-master
  hostname = mail.YOURDOMAIN.COM
  mail_plugins = sieve
  postmaster_address = postmaster@YOURDOMAIN.COM
}

namespace inbox {
  inbox = yes
  location =
  mailbox Drafts {
    special_use = \Drafts
  }
  mailbox Junk {
    special_use = \Junk
  }
  mailbox Sent {
    special_use = \Sent
  }
  mailbox "Sent Messages" {
    special_use = \Sent
  }
  mailbox Trash {
    special_use = \Trash
  }
  prefix =
}
This file should be owned by the dovecot user with file permissions of 600
And now create the file /etc/dovecot/dovecot-sql.conf.ext.
driver = mysql
connect = host=localhost dbname=postfix user=postfix password=REPLACE_WITH_YOUR_DATABASE_PASSWORD port=3306

default_pass_scheme = MD5-CRYPT

# Query to retrieve password. user can be used to retrieve username in other
# formats also.

password_query = SELECT username AS user,password FROM mailbox WHERE username = '%u' AND active='1'

user_query = SELECT CONCAT('/var/mail/vdomains/', maildir) AS home, 5000 AS uid, 5000 AS gid, CONCAT('*:bytes=', quota) AS quota_rule FROM mailbox WHERE username = '%u' AND active='1'

# For using doveadm -A:
iterate_query = SELECT username, domain FROM mailbox
This file contains passwords. It should be owned by the dovecot user with file permissions of 600.
Roundcube: Webmail for your domain
Roundcube is a free webmail package we installed in a previous step. To enable the software, create another Apache VirtualHost configuration in /etc/apache2/sites-available/mail.yourdomain.com.conf containing the following:
<VirtualHost *:80>
    ServerName mail.yourdomain.com
    RewriteEngine On
    RewriteRule   ^(.*)$  https://%{HTTP_HOST}$1  [R=301]
</VirtualHost>

<VirtualHost *:443>
    ServerName mail.yourdomain.com
    ErrorLog logs/mail.yourdomain.com-error.log
    CustomLog logs/mail.yourdomain.com-access.log combined
    LogLevel warn

    Alias / /var/lib/roundcube/

    <Directory /var/lib/roundcube/>
      Options +FollowSymLinks
      # This is needed to parse /var/lib/roundcube/.htaccess. See its
      # content before setting AllowOverride to None.
      AllowOverride All
      <IfVersion >= 2.3>
        Require all granted
      </IfVersion>
      <IfVersion < 2.3>
        Order allow,deny
        Allow from all
      </IfVersion>
    </Directory>

    # Protecting basic directories:
    <Directory /var/lib/roundcube/config>
        Options -FollowSymLinks
        AllowOverride None
    </Directory>

    <Directory /var/lib/roundcube/temp>
        Options -FollowSymLinks
        AllowOverride None
        <IfVersion >= 2.3>
          Require all denied
        </IfVersion>
        <IfVersion < 2.3>
          Order allow,deny
          Deny from all
        </IfVersion>
    </Directory>

    <Directory /var/lib/roundcube/logs>
            Options -FollowSymLinks
            AllowOverride None
      <IfVersion >= 2.3>
        Require all granted
      </IfVersion>
      <IfVersion < 2.3>
        Order allow,deny
        Allow from all
      </IfVersion>
    </Directory>

    # Protecting basic directories:
    <Directory /var/lib/roundcube/config>
        Options -FollowSymLinks
        AllowOverride None
    </Directory>

    <Directory /var/lib/roundcube/temp>
        Options -FollowSymLinks
        AllowOverride None
        <IfVersion >= 2.3>
          Require all denied
        </IfVersion>
        <IfVersion < 2.3>
          Order allow,deny
          Deny from all
        </IfVersion>
    </Directory>

    <Directory /var/lib/roundcube/logs>
        Options -FollowSymLinks
        AllowOverride None
        <IfVersion >= 2.3>
          Require all denied
        </IfVersion>
        <IfVersion < 2.3>
          Order allow,deny
          Deny from all
        </IfVersion>
    </Directory>
        # HSTS (mod_headers is required) (15768000 seconds = 6 months)
    Header always set Strict-Transport-Security "max-age=15768000"

    SSLCertificateFile /etc/letsencrypt/live/mail.yourdomain.com/fullchain.pem
    SSLCertificateKeyFile /etc/letsencrypt/live/mail.yourdomain.com/privkey.pem
    Include /etc/letsencrypt/options-ssl-apache.conf

    <FilesMatch "\.(cgi|shtml|phtml|php)$">
        SSLOptions +StdEnvVars
    </FilesMatch>
    <Directory "/var/www/cgi-bin">
        SSLOptions +StdEnvVars
    </Directory>

    Alias /icons /usr/share/httpd/icons
    <Directory /usr/share/httpd/icons>
      Require all granted
    </Directory>

    Alias /error /usr/share/httpd/error
    <Directory /usr/share/httpd/error>
      Require all granted
    </Directory>

    #CustomLog logs/ssl_request_log "%t %h %{SSL_PROTOCOL}x %{SSL_CIPHER}x \"%r\" %b"
</VirtualHost>
Now enable the configuration similarly to how we enabled postfixadmin earlier.
$ sudo a2ensite postfixadmin.yourdomain.com
$ sudo systemctl restart apache2
Roundcube: Reading your email
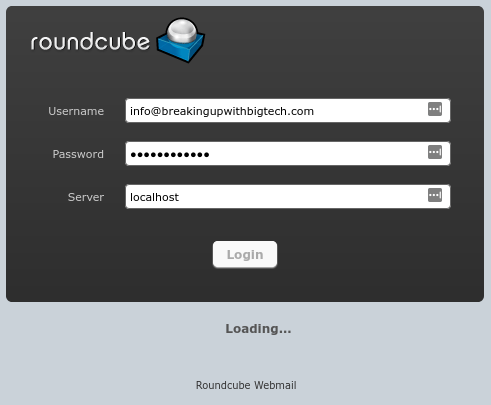
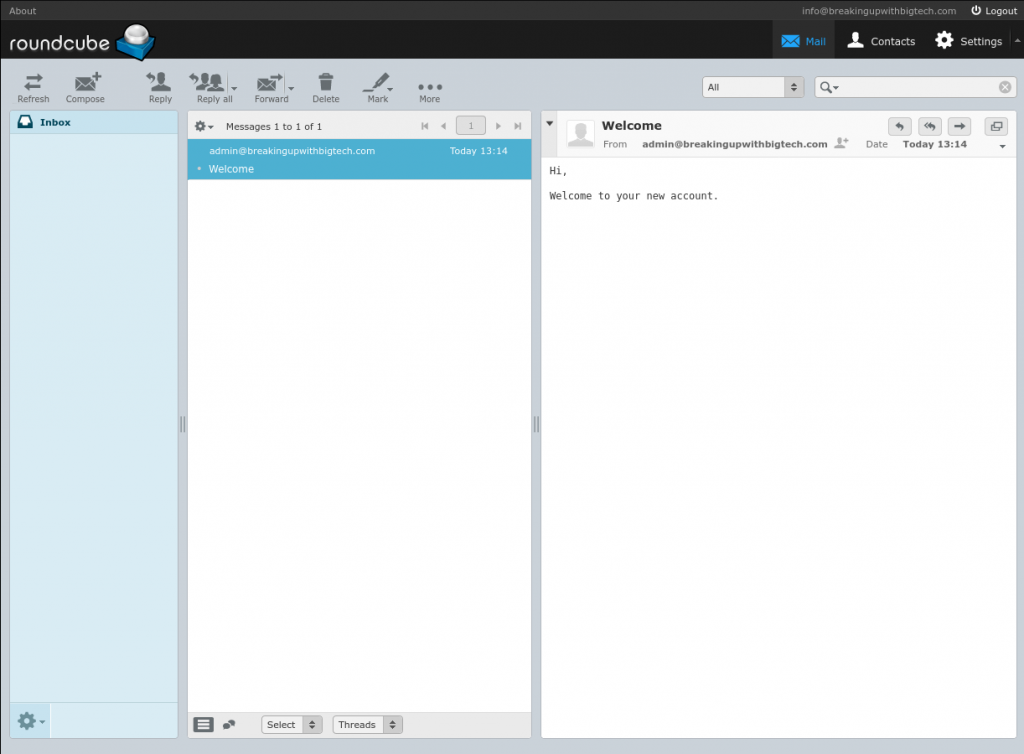
To read your email in your new Roundcube installation, open your favorite browser and go to https://mail.yourdomain.com. Log in with the email credentials you used when you created your email mailbox earlier (info@breakingupwithbigtech.com in our example). If prompted for a server name, enter ‘localhost’
Roundcube: Sending email
By default, roundcube attempts to utilize “submission”, which is a postfix listener that is disabled by default.
Open /etc/postfix/master.cf and add the following configuration to enable Postfix’s submission listener
submission inet n       -       y       -       -       smtpd
  -o syslog_name=postfix/submission
  -o smtpd_tls_security_level=may
  -o smtpd_sasl_auth_enable=yes
  -o smtpd_reject_unlisted_recipient=no
  -o smtpd_client_restrictions=$mua_client_restrictions
  -o smtpd_helo_restrictions=$mua_helo_restrictions
  -o smtpd_sender_restrictions=$mua_sender_restrictions
  -o smtpd_recipient_restrictions=
  -o mynetworks=127.0.0.1/32,[::1]/128
  -o smtpd_relay_restrictions=permit_mynetworks,permit_sasl_authenticated,reject
  -o milter_macro_daemon_name=ORIGINATING
Now restart postfix to make the changes take effect.
$ sudo systemctl postfix restartLaunch Time!
Updating DNS MX records
At this point the email server should be ready to receive email from the internet. Log in to your DNS provider’s console and create (or update) an MX record for your domain.
- Host: mail
- Target: @
- Priority: 10
- TTL: [default]
Test email
You will need another email account outside your domain to send messages to your newly created email server.
Send yourself an email to your newly created mailbox.
Email Admin 101: Mailboxes, aliases and quotas
Your mail system setup is now complete.
With PostfixAdmin you will be able to add as many email mailboxes as you like. Create multiple email boxes for different purposes, or offer email boxes to your friends and family. This email server solution should also suit the needs of a small business seeking to host their own email infrastructure.
With email aliases you can create email addresses that forward to one or more other email addresses. This could be used to create an alias to provide to someone, while keeping your main email address private. Aliases can also be used to implement server level distribution lists.
Email quotas let the email administrator define how much disk space a mailbox may consume. This feature is worth consideration even if you do not have many email users, or expect much email traffic. Quotas can help to protect against the email system running out of disk space due to overly large mailboxes.
Next Steps
Congratulations on your new self hosted private email server!
While this email system will serve your needs well, it can be made even better. Through the use of additional software and configuration this email system can be extended to provide virus scanning for incoming email attachments, spam identification with optional quarantine, DomainKeys Identified Mail (DKIM) message signing and verification, and more!
Our ebook is designed to take you through the process, step by step, including necessary configuration files and commands, as well as detailed explanations of the configuration and commands involved.
Keep your email and your digital identity secure with the advanced self hosted private email ebook today!